
Move forward in the training series or go back to the previous section:
↩️ Return to the previous section? 1) Account Set-up
👫👬👫 TEAMS? Data Default Columns for Admin account with Manager Suite
COLLEGE SEARCH & LIST BUILDING IN APP TOUR
Look for the Onboarding Checklist button in the lower right hand corner of your screen for a fast in app tour of college list builder.

|
|


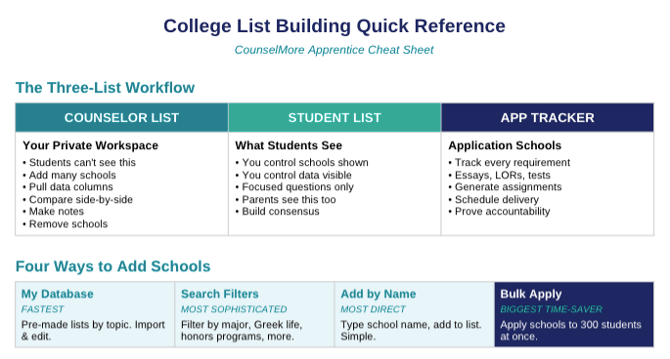
✴️ THE COLLEGE LIST ✴️
The College List represents more than just a list—it’s a tangible, high-value product that reflects the counselor’s expertise and the depth of their research.
Families view this list as proof of value. It reassures them that choosing this counselor was the right decision and that their investment of time and trust is well-placed. A thoughtfully built college list demonstrates professional judgment, personalized insight, and the counselor’s commitment to helping each student find the best-fit campus experience.
COLLEGE LISTS OPTIONS

✴️ First, try list building per student with the instructions below. Later, set global account choices in Settings > Data Manager that will appear initially at the start of each list building process. Use the practice student record to get-to-know list options.
 |
|
Counselor List *Menu*:
Tile view and Grid view is a list view option. Article
My Database is where Counselors retrieve lists of schools saved by tag. Article
Search leads to the ability to seek out schools per major, location and other specialty filters. Article
Add College by Name by searching keyword in the school's title. Article
College Data Menu are the data column controls for this specific student record. Article
Enable Data Correction Mode is how to submit updated data requests Article
Download Fit Evaluations produces a Counselor school comparison report, to be shared with students. Article
Download Excel option will download the current list to the local area storage. It can be shared or uploaded anywhere. Article
COLLEGE SEARCH OPTIONS
More than one way to "Search" and add schools to the Counselor or Student lists.
💡 TIP: Counselor List > Menu > MY DATABASE
Make a list of schools by topic or major quickly by relying on previously saved lists by topic. CounselMore gives you several lists by topic to jump start your college knowledge. These are from the CounselMore community.

Navigate to Counselor List > Menu > My Database
There are several pre-made lists by topic included in your account already. These are Starter-lists by topic.
Click a topic and Show Results to see the schools on the list or Import These Lists to make the list your own and continue adding new schools to the same list. The new list of schools is only shared with your account.
Tag schools anytime to group schools by topic. Retrieve topic lists from My Database.
HOW TO BUILD A COLLEGE LIST
1. List view: Toggle between to Grid & Tile view
Tile view for client presentation setting and grid view for data review.
2. Add Schools to Counselor List via choice of options.
My Database provides school lists by topic, created by the CounselMore community.
Search is more traditional with nuanced filters expressly for counselors.
Add by name using keyword search of over 3200 schools worldwide.
3. After adding schools to Counselor List, pull forward Data Columns from the Data Menu to compare schools side-by-side with the most up-to-date data.
Add data columns to the Counselor list for the purpose of the Counselor's professional filtered assessment of campus fit, based on each practitioners unique assessment. To support that assessment there are additional tools and reports explained below.
 |
 |
 |
Keep notes in the Counselor List column: Notes to Student

Learn to build a college list using sample student record. Then set global account choices via the default data choices in the account settings menu.
COUNSELOR LIST
Counselors can choose to skip the Counselor list and begin with the Student list or even allow the Student to lead and execute the list building process entirely through the Student Portal. Counselors have excellent user-flexibility!
The Counselor List serves as your private research station—a place to explore, compare, and curate schools before sharing them with students. Only you can see your Counselor List. When ready, click the graduation cap icon to promote a school to the Student List, making it visible in the student’s portal.
Students can also add schools to their list by name or, if you allow it, by using the proprietary search tools. You’ll always know which schools were student-added—these appear with a small yellow dot—and you’ll receive a notification each time a student adds a new school.

STUDENT LIST
Methodology: The Counselor searches for and creates a backlog of possible schools onto the Counselor List - those fit the student's criteria. The Counselor will then promote schools to the Student List.
The Student List is what students see in their Student Portal—it starts empty until schools are added.
✴️ Counselors control student's search access: students can add schools by name, using the Menu button, and if granted permission, they can also use the search engine. The Counselor, Student, and Parent Portals share the same layout, so no one has to learn multiple interfaces.
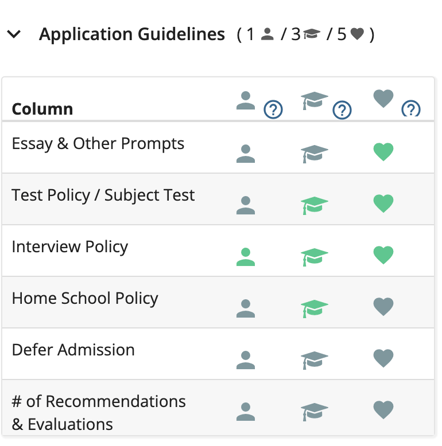
The Counselor can include different data columns in the Student List, than in other lists—these should focus on what matters most to the student and on key action items before applications begin.
For example, a junior might still be exploring schools but needs to know interview or recommendation requirements early to plan ahead.
In that case, the Counselor will turn on data columns such as; Test Policy & Testing Status or Recommendations Policy & Recommendations Status. (see image below illustrating the columns)

For student-athletes, add an Athletic Staff Contact column and a Custom Status column to record outreach and coach responses. When the school becomes an “Apply” school, promote it to the App Tracker using the graduation cap icon. This way, the entire process—from early exploration to final application—stays connected, and no progress or notes are lost.
(See image below)

APP TRACKER
The App Tracker is its own dedicated training for a reason—it’s the heart of how CounselMore tracks every requirement, status, and strategic step in the application process. Before moving forward, complete this current Counselor/Student List training module. Review Data Default options below and clear away questions before moving on to the next training. Mastering this section ensures you’ll be ready for the next training, where we’ll explore the App Tracker in detail and show how to manage each student’s application strategy from start to finish. If you can't wait, the links below dive into App Tracker details.
Mentors - How to set up your App Tracker
Assignments tab - Create Assignments from App Tracker & the Student list
App Tracker - Status & Strategy Columns for application requirement columns
Manage Essays with App Tracker
Retrieve Application Outcomes from Students & Parents Retroactively
DATA DEFAULT COLUMNS
CUSTOM DATA COLUMNS
Familiarize yourself with the data supplied by CounselMore.
Many average counselors maintain Google spreadsheets with personally collected college information, but CounselMore Counselors keep their specialty information in custom columns they create inside CounselMore > they see all their data in one place! CounselMore counselors can create custom data columns and update information anytime—visible only within their own accounts.
For example, when viewing a list of schools, you might add columns that display standard data such as admissions GPA. Alongside that, you can include your own custom column where you’ve been tracking GPA per Program or other specialized insights. Improving Counselor's ability to access their experiential knowledge and make fit assessments faster.
Displaying these custom columns not only enhances your own analysis but also demonstrates to families the depth of your expertise and the rigor of your ongoing research.
Some counselors maintain Google Sheets so they can share information with colleagues. CounselMore makes this collaboration easy—data can be exported directly to Google Drive, allowing you to share selected information externally when needed.
It’s most efficient to keep your data organized within CounselMore. This ensures your workflow remains seamless and that you can make informed, value-based decisions about campus fit without toggling between multiple tools. Your custom data is always accessible where you work—inside CounselMore—helping you stay focused, efficient, and confident in your process.
✴️ Bonus! Support@counselmore.com will upload your data for you!
Build your practice in CounselMore.
MOST UP-TO-DATE ADMISSIONS DATA IN THE WORLD
TOP 1000 SCHOOLS APP REQUIREMENTS & ESSAY PROMPTS
College Data - Where is it from & is it Reliable
College Data Menu - Resources, data dictionary, data glossary
College Data - Add a New College into the Database
College Data - Submit Data correction contribution - Crowdsourced Knowledge - Verified
Most often selected data columns for each list counselor, student, app tracker
When are the Deadlines Updated?
Admissions Data - Data Menu Defaults, Data Updates Calendar

DATE STAMPED DATA
Each cell is date-stamped for freshness, ensuring data transparency. If you notice a discrepancy, simply report it as a data correction—our team will research, verify, and update the record, displaying a new “Last Updated” date directly in the app.
DATA UPDATES
Not all college data is released at the same time—schools publish updates as information becomes available. For that reason, a data point may not always need immediate updating. When considering whether something should be refreshed, first check how recent the last update was and whether it remains relevant for the current admissions cycle or “conversation of the day.”
CounselMore updates data frequently and time-stamps each entry to reflect the most recent verification date. This transparency ensures you always know how current the information is—an assurance no other platform provides.
If you have credible, firsthand information or “insider details” that differ from what’s displayed, you can submit a data correction request. Our team will research, verify, and update the entry as needed. CounselMore’s commitment to accuracy and recency makes it one of the most reliable data resources available to college counseling professionals.
💡 TIP: When colleges are added to the Counselor list, you will find that we have already chosen a few data columns for you to begin. Change these columns per student or make global account choices, so that specific columns begin each list.
Use Search or Add Schools by name from within Active Student record.
Choose global account Default Data columns:
💡 TIP: Avoid new-comer pitfalls... Do this instead: play with search and data columns in your Sample Student Account first before making changes in Settings menu.
💡 TIP: No list must remain static.Quickly answer your school-related questions by enabling relevant data columns and directly comparing information. Use the Counselor Notes column to record insights as you review each school. Begin with multiple data columns, and easily remove any unnecessary columns by clicking the trash icon in the column header to tailor the view for each student.
Keep conversations focused.
- If a student has a question about sports facilities on campus, simply add the corresponding data column to address their inquiry. Once you've provided the information, remove the excess column by clicking the Trash icon in the column header to keep the list focused and relevant.
👫👬👫 TEAMS? Data Default Columns for Admin account with Manager Suite
Step 1: Navigate to Settings > Defaults

Step 2: Choose Data Points
Step 3: Select Columns
Step 4: Confirm Selections
Warning:
Existing student records will retain their current layout and previously chosen data columns. Data columns added to individual lists previously will not be removed.Although New columns will be added to the far right of all existing lists.
Data Definitions and Glossary
The next few sections discuss types of data. To jump to App Tracker
Different Types of Data Columns - Create, store, retrieve your own custom data
Custom Data Column: Create a unique information column visible only to you. Use it to track specific college information, just like any other data point. If you need to track something specific, a custom column provides an editable space for that information.
Custom Status Column: Add editable columns in the Application Tracker for both you and your student. Ideal for counselors with a proprietary application process, even though there are several existing status columns to choose from.
Warning:
Do not use a Custom Data Column for student-specific notes or tasks, as these columns are for your esoteric information keeping or to store niche specific application knowledge. Custom columns are editable only by you and function similar to any other data point supplied by CounselMore.
What are Custom Data Columns, and why would a counselor use them?
Custom Data Columns are tailored to individual counseling practices, allowing counselors to track specific information about schools that aligns with their unique style or needs. Here's how some counselors have utilized them:
One counselor created a custom column to record her specific contacts within each school's athletics department.
Another way to use Custom Columns: Track in-person audition details.
Yet another counselor used a custom column to track internal on-campus scholarships.
These examples illustrate the flexibility of Custom Data Columns, enabling counselors to personalize their tracking methods according to their specific requirements and practices.
What are Custom App Tracker columns, and why would a counselor use them?
Custom Application Tracker columns are utilized to add specific tasks to a student's App Tracker or Student list, allowing both the counselor and student to monitor the progress of these tasks for each school. But they do even more!
Here's how some counselors have implemented them: One counselor added a "Campus Visit" column to the Application Tracker. Her student uses this column to record their progress on scheduling campus visits for each school on their application list.
-
An athletic recruiter added custom App Tracker columns to the Student list for the process that happens prior to application or even the final application-list.
These custom columns provide a personalized way to manage and track specific tasks, enhancing the efficiency and organization of the application process for both counselors and students.
How do I build Custom Columns?
- Navigate to "Settings," then "Data Manager."
- Open the banner labeled "Per School Custom Columns"

- Enter your desired label for the column.
- Click the green button to show the column on the List, then click the "+" button to the right.
- If you want the Custom Column to appear for all students, click the "Merge with All Students" button.
- If you want to choose the column for individual students, don't click "Merge with All" and instead select it for each student, within each student's record.
- On the same page there is a blue warning box regarding "Merge with all students" at the top of the page. Please review.
Add Your Counselor Opinions, Tags, Links, and College Notes
In your Counselor list, you can view various existing Custom Data Columns, by scrolling all the way to the right.
Counselor Opinion Column:
Only available in the Counselor's list
-
Scroll over any cell in the column.
-
See eyeball appear.
-
Double click eyeball
-
Type in your comment
-
click Save
-
Click closed.
Links Column

Easily build your college reference knowledge by saving links to programs, insider's info, Kool things to know, and more... within any school row, in your Links column. Simply copy and paste the URL address to reference web pages about the school or program, or link to outside agencies with news articles or opinions.
How would a counselor use the links column?
Link to Chapman University California's Facebook page, via your links column. Turn on the link for a student. You have now introduced Chapman's extensive social media presence to your student. This is an excellent time to discuss demonstrated interest. Good thing you had a convenient tool where you could save that link!
- Scroll over any cell.
- The Pencil will appear
- A new box will open
- Click on Add Link
- In another tab, find your resource and copy the URL address
- Return to your CounselMore tab and determine a label for your link, see above the label is Analytics,
- Paste your link into the URL field
- Click Apply
- When you export a list to the Student's Google folder, the links column will appear.
- The links can be turned off/on per student.
- After saving the link, close the box
- Scroll over the box again.
- The Pencil will appear
- A new box will open
- See the Green Eyeball, click on it.
The eyeball is grey, it will not show for that student. It will not appear in their list export or in their student portal.
The eyeball is green, it will show for that student. It will appear in their list export and in their student portal.
TIP: If you have existing College Notes, Tour notes, or pictures saved on your Google Drive, simply copy the link to those documents or folders and add the link to the corresponding college. This allows easy access and the flexibility to share or restrict these items per student.
Tags Column

Add tag(s) to schools from anywhere in the app!
-
While you are looking at a list of schools, scroll to the right. The Tags column will be near the end.
-
Double click on the cell you wish to add tags to.
-
You will see a small popup where you will type the tag(s) for that college.
-
Type the tag and hit return/enter on your keyboard to create/commit the tag.
-
Repeat step 4 as many times as you like.
Once you have schools tagged it is easy to apply this full or partial list of schools to another student.
-
Select the student you will apply the schools to.
-
Go to their Counselor List, click on the menu button
 , click on Search.
 -
Click on the tab "My Database"
-
Click the button on the left side called "My Lists".
-
Choose the appropriate tag and click the button to the right that says Show Results.
-
Select some or all of the schools. Note: the Select All checkbox at the top of the table selects all schools on the page. If you want to select schools on page 2, go to page 2 and select them.
How to delete Tags
- Round blue button
- select Search
- select My Database - look lower left
- select My Lists
- look center screen for your list of tags.
- see trash can
College Notes column
Add any notes, private to counselor unless counselor chooses to share with student. Later, search all account notes by key word - pulling forward any schools with those notes with those words.
App Tracker - Setting up for App Season
💡 TIP:
CounselMore has several Peer Mentors, these are other professional members who show how they use the tools.
App Tracker Navigation
-
Watch the video for visual reference while learning to navigate the App Tracker tab.
-
On the far left of the school name on the App Tracker screen, you'll find a red button used to delete information. Clicking it sends the school back to the Student list.
-
Next to it, you can prioritize schools by changing the number and pressing enter.
-
Above that, you can reorder schools using the click, drag, and drop feature.
-
The "Fit" columns, labeled as Net, Fit, Reach, and Lottery, carry over from the Counselor list and represent the student's chances of admission:
-
Net: Very high chance
-
Fit: Medium chance
-
Reach: Unlikely chance, but possible with effort
-
Lottery: Extremely low chance
-
-
You can rearrange these columns by clicking and dragging the header.
-
All schools on the App Tracker are visible to the Student and Parent. Share your screen with the student to review task status.
-
When a task is complete, check the box in the top right corner of the status cell, turning it green.
Selecting Data Columns from within a Student Record
-
Navigate to any of the 3 lists of any student record
-
Click the round blue button with the orange halo
-
Click College Data Menu
-
At the top of the page is the student's name. You are now choosing data columns for this student's App Tracker.
Super TIP:
Turn on the Essays & Other Prompts column for the App Tracker. Navigate to the column in the App Tracker. Prepare the student's prompts for each school by auto-generating a Google-doc INSIDE the student's Google drive folder. With one click!
Jump to this training to learn more.

Accepted / Declined / Waitlisted
All schools promoted to the App Tracker will automatically appear in the student profile.
- Click the pencil icon to the left of the name on the student record.
- Student Profile will appear.
- Click on Accepted / Declined banner
Track acceptances, majors, rewards and the inevitable results - easy!
Export App Tracker to Files Tab
You can also export the App Tracker directly to the student's Google drive folder. Clients are impressed with the comfortable review of a spreadsheet, delivered directly to their email box.
- Export the App Tracker using the Round button.
- Goto to Assignments tab.
- Make a New Assignment, copy to parents, start date today. Link Assignment to the spreadsheet in student's folder. Email.
Onto the next section in your Training Program, Student & Parent Portals.
Still have questions or need additional support?
Write down any questions you have, and if needed, meet with a Tech Mentor to supplement your self-guided setup.
Assignments from App Tracker
Generate assignments directly from the student list and the app tracker!
Read here 👉 Assignments tab - Create Assignments from App Tracker & the Student list
Counselor Community Study Hall
On Fridays, CounselMore members meet for Study Hall.
Onto the next section in your Training Program, 3) Student & Parent Portal
What does the Parent portal look like?

Counselors move to the Student Profile by clicking the pencil but for parents there is a button to move between student profile and process flow.

😀 Now that you have reviewed the video, are you ready to follow up with your CounselMore Tech Mentor?
Yes, and click here to reserve a time.
No, and return to the previous step in your onboarding process.
Or Meet with a CounselMore Team Member.
Return to the previous section in your Training Program
1) Account Settings & Customization
👉 Continue your learning journey: Proceed with the next Training Programs below.
4) Google Drive Prep & Connect