Settings - Broadcast Station, Send or Schedule Messages with attachments to segmented audiences
In your Settings Menu, navigate to Broadcast Station. Send text and email alerts to mailing lists and segments for immediate send or scheduled to send in the future.
The Broadcast Station is an excellent communication tool for mass communication to segments of your audience and will also carry attachments. Counselors have great success using scheduled broadcasts as a way to communicate important milestones and reminders broadly.
CounselMore is a Service Delivery Platform specifically for educational service providers. It is not intended to be a traditional marketing tool, but we know our members stretch the technology and we use that to guide our further development.
Send Marketing Emails
CounselMore Broadcast Station is for information broadcast however, it is also capable of sending attachments. If you wish to partner CounselMore with a customer relations email marketing CRM tool, such as Mail Chimp or Pipe Drive, export a CSV list of your students and related contacts for easy import to any tool.
API Integration
If you wish to create automated integration between CRM tools, email marketing tools or Sales app through API, reach out to support@counselmore.com, we can help you with our Custom Solutions to make all of your apps communicate seamlessly.
Peer Mentor Video - click here
Demo video below
🚧 🚧 The video below contain outdated user interface, Live Accounts will experience and updated interface with additional capabilities not seen in the video. 🚧 🚧
Overview:
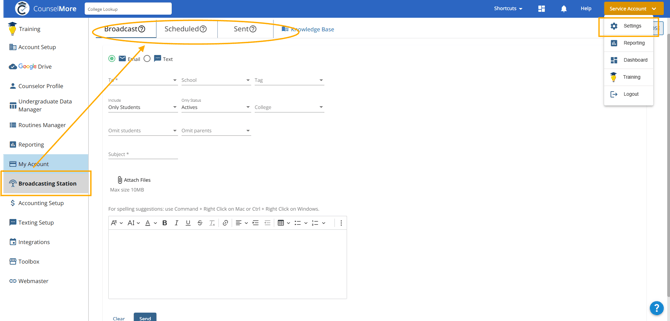
- Click Settings in the top right hand corner of your app
- When the settings menu opens look to the left hand side and select broadcast station
- When the broadcast station has opened
- You can schedule a message to send by text or email to be sent immediately
- There is also the ability to choose graduation years, student only or parent only, and to omit specific people from group emails.
- All of this can also be done with a scheduled message to be delivered in the future.
Steps to create a broadcast message to be sent immediately:
Broadcast messages are a powerful tool for counselors to engage with their students and parents efficiently. To make the most of this feature, it's crucial to fill in the necessary fields accurately. This step-by-step guide will walk you through the process of creating a broadcast email in CounselMore.
1. Fill in the Necessary Fields:
a. To (Recipients):
Choose the recipients of your broadcast email based on grad year categories or select all grad year students present in your app. This allows you to tailor your message to specific groups, ensuring relevance.
b. School:
Indicate the high school from which the students are. This is particularly useful if you work with students from multiple high schools.
c. Tags:
Utilize the unique tagging feature to categorize your students. Tags can represent various criteria, such as interests, achievements, or specific needs.
d. Inclusion:
Decide whether you want to send the email to your students, their parents, or both. This flexibility ensures that your communication is targeted and reaches the intended audience.
e. Only Status:
Segment your audience based on the status of the students—whether they are active, prospects, or all. This feature helps tailor messages to different stages of the counseling process.
f. College:
Select the college to target recipients associated with that college
g. Omit students:
Exercise control over your recipient list by omitting specific students. This is particularly handy when you want to exclude certain individuals from receiving a particular message.
h. Omit parents:
Exercise control over your recipient list by omitting specific parents.
i. Subject:
Craft a clear and specific subject for your email. A well-defined subject ensures that recipients understand the purpose of the message and encourages them to open and read it.
2. Compose Your Message:
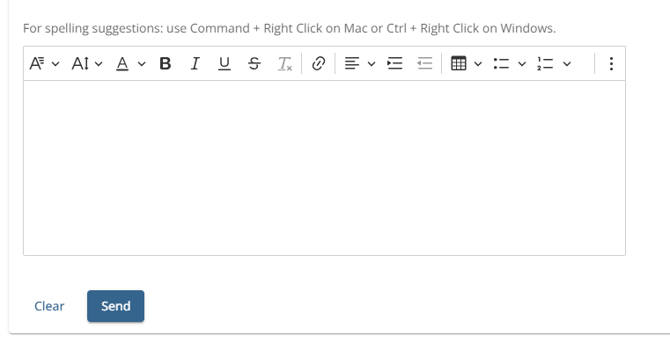
Once you've defined your audience and filled in the necessary fields, it's time to craft your message in the designated text box. Take advantage of the various features available, such as selecting font styles, adjusting font sizes, and more. This allows you to customize your message and make it visually appealing to your recipients.
NOTE:
You have the freedom to express yourself without any word limit when sending a broadcast message. Whether your email is long or short, you can send it without any restrictions.
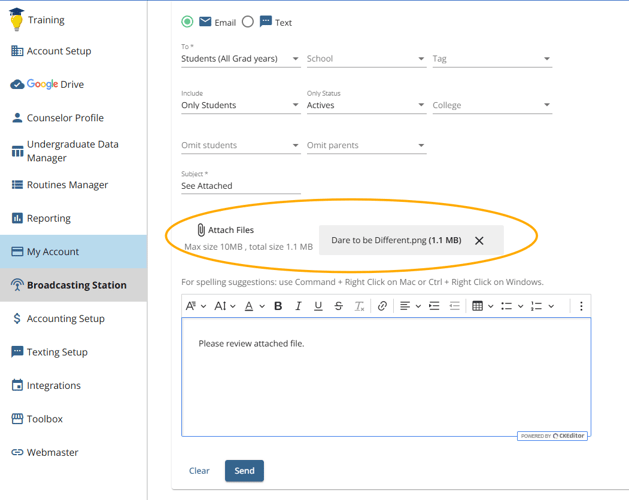
3. Attach Files:
To enhance the clarity and understanding of your message for your recipients, you also have the option to attach files such as images or documents. This allows you to provide additional information or visual aids to support your broadcast message.
4. Send Immediately:
Once you have finished composing your message and providing the required information, you can now send it immediately by simply clicking the send button. You will then receive a notification confirming that your email has been successfully sent to your recipient/s.

Steps to send a broadcast message that is scheduled to be sent in the future:
1. Navigate to Scheduled Tab:
Click the create broadcast button

2. Fill in the Necessary Fields and craft your message
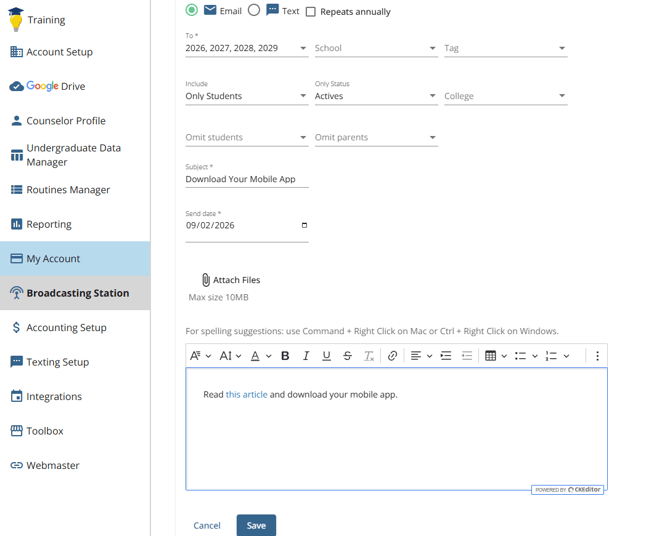
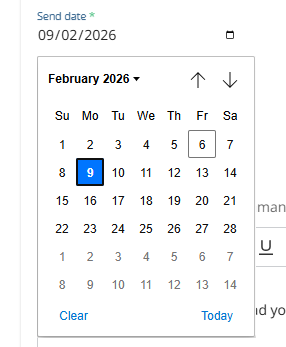
3. Select the date
One of the unique features of the broadcast station is the ability to schedule a broadcast email to be sent in the future. This feature allows you to plan and automate your communication, ensuring that your message reaches the intended recipients at the right time.
4. Scheduled broadcast message:
After you have completed composing your message and providing the necessary information, you can save it by clicking on the save button. You will then receive a notification confirming that your email has been successfully scheduled.
Scheduled Repeats Annually

When scheduling a broadcast for an annual send:
-
You cannot select today’s date or any past date.
-
The system will automatically schedule the broadcast for the next available future date and repeat it annually on that date going forward.
To send a broadcast immediately, choose broadcast's send immediately instead of scheduling it.
Scheduled Broadcast Messages
💡Note: Scheduled broadcasts should be created and saved at least 48 hours in advance of the intended send time. While messages may process within 24 hours, allowing 48 hours ensures they are sent as expected.
TIP:
Edit Previously Scheduled Broadcast Messages
Human errors happen, and sometimes, we realize there's a need to modify information in our emails. No need to worry—CounselMore has you covered!
To edit your scheduled broadcast email, simply click on the pencil icon located on the left side of the saved scheduled broadcast email. ![]()
