
Step 1: Go to Accounting Setup
-
Navigate to Settings
-
Click Accounting Setup
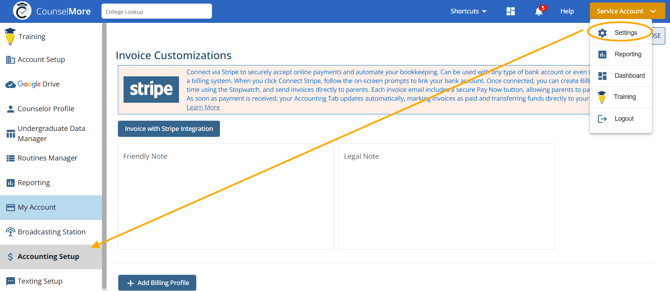
This is where you’ll configure how your invoices look and how billing works.
Step 2: Customize Your Invoice
Under Invoice Customization, you can configure the following:
1. Stripe Integration
-
If you want to accept online payments, you can connect your Stripe account here.
-
If Stripe is not connected, you can still create invoices and manually record payments.
2. Add a Friendly Note
-
Enter a short message that will appear on invoices (for example, a thank-you note or payment reminder).
3. Add a Legal Note
-
Include any legal or payment terms such as refund policies or late fees.
Step 3: Add a Billing Profile

Billing profiles define how you charge for your services.
-
In Accounting Setup, go to + Billing Profiles
-
Fill in the following information:
-
Billing Profile Title
-
Description
-
Type:
-
Package
-
Hourly
-
Block of Hours
-
-
Currency Symbol
-
Rate
-
-
Click Submit
You can create multiple billing profiles for different services.
Step 4: Add Charges or Payments to a Student
-
Open the Student Record
-
Go to the Accounting tab
-
Click the Menu icon
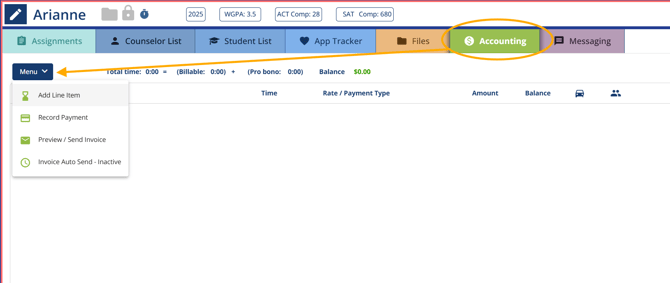
From the menu, choose one of the following:
1. Add Line Item
Use this option to charge for services. You can enter:
-
Date
-
Miles (if applicable)
-
Hours
-
Minutes
-
Billing profile
-
Rate
-
Purpose or description
2. Record Payment
Use this option if a payment has already been received. You can enter:
-
Date
-
Currency
-
Amount
-
Payment method
-
Notes
Step 5: Preview or Send the Invoice
Once at least one line item or payment has been added:
-
Click the Menu icon
-
Select Preview Invoice or Send Invoice
You’ll be able to review the invoice before sending it to the family.
Note: Make sure you click the "parent icon" ![]() to control which entries appear on the invoice.
to control which entries appear on the invoice.
Optional: Add Line Items Using Time Tracking
You can also add charges using the Time Tracking feature:
-
Start the time tracker while working on a student
-
Stop the tracker when finished
-
Click Add Line Item
Read more here: Student Profile - Stopwatch, Time Tracking