Bio Banners - Student Information banner in Student Profile - Accepted Declined, Application Outcomes, banner
The Accepted/Declined banner is a powerful tool located within the Student Record. It plays a critical role in tracking and managing the outcomes of your students’ applications, even after your formal counseling process has concluded.
Key Features
1. Adding Colleges for Record Keeping
◦ If your student continues to apply to additional colleges after your counseling process has ended, you can add those colleges directly to the Accepted/Declined banner.
◦ This ensures that the information is captured in your student’s profile for complete and accurate documentation.
2. Integration with App Tracker
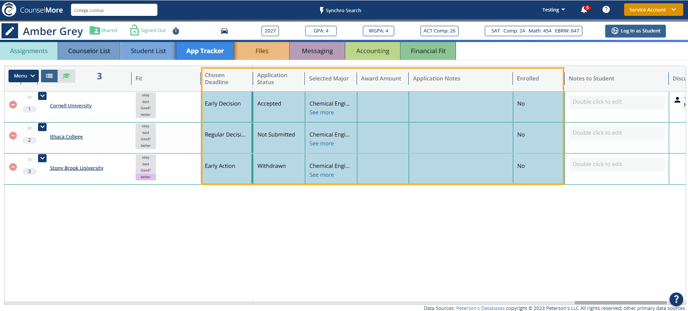
◦ This seamless integration reduces the need for duplicate data entry and streamlines the tracking process. When schools are added to the app tracker, they will also appear here. The App Tracker has Application Outcome tracking columns (blue) those correspond with the information in the student profile. Update in either place.
3. Data Analytics and Outcome Tracking
◦ Adding schools to the Accepted/Declined banner ensures they are included in your overall data analytics.
To have a full picture of application outcomes and decisions, use this banner to track all results—even for schools added after the initial list was finalized.
How to Add Colleges
1. To access the Accepted/Declined banner, open the Student Record Form for the student. 
2. Navigate to the Accepted/Declined banner section.

Any college already listed in the App Tracker Tab will appear automatically in the Accepted/Declined banner. For more details on how this integration works, refer to this article.
3. Add the desired college(s) to the banner and update the corresponding decision status.

Understanding the Accepted/Declined Banner Columns
The Accepted/Declined banner contains seven columns, each designed to provide detailed insights into the college application process and outcomes.
![]()
Here's what each column represents:
1. College
◦ Lists the name of the college or university the student applied to.
2. Status
◦ Tracks the application result or decision. Options include:

▪ Submitted: The application has been submitted but no decision has been received yet.
▪ Not Submitted: The application has not yet been submitted.
▪ Made Deposit: Indicates the student has committed to the college by submitting a deposit.
▪ Accepted: The student has been accepted to the college.
▪ Waitlisted: The application is on hold, and the student may still receive an offer.
▪ Deferred: The decision has been postponed to a later admissions cycle.
▪ Denied: The application was not accepted.
▪ Withdrawn: The student decided to withdraw their application.
3. Major
◦ Records the specific major the student applied for at each college.
4. Chosen Deadline
◦ Captures the type of application deadline the student selected, such as Early Decision, Early Action, Regular Decision, or Rolling.
5. Award Amount
◦ Tracks any scholarship, grant, or financial aid amounts offered by the college. This helps monitor the financial aspect of the application process.
6. Application Notes
◦ Provides space to record any important notes about the application, such as unique circumstances, communication with admissions, or special considerations.
7. Enrolled Status
◦ Indicates whether the student has officially enrolled at the college.


